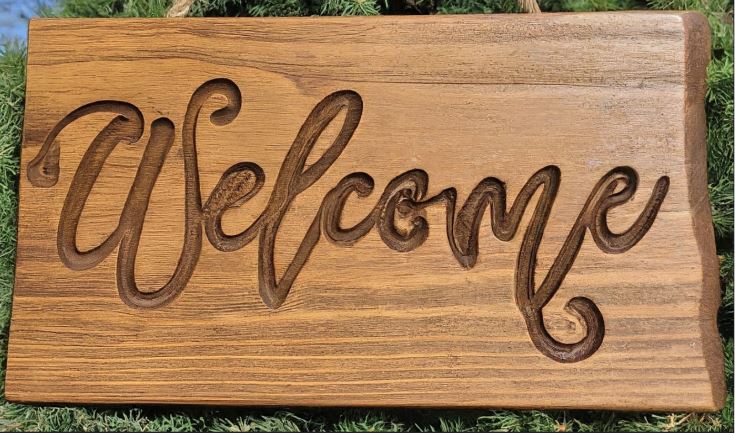
How to Make a Wooden Sign with a Router
Routing Wooden Signs:
Routing a wooden sign can be a great DIY project. You can make unique and personalized signs for businesses, homes, or special events with just a router…
In this step-by-step guide, we will talk about everything from wood selection to carving techniques, to which router bits to use. Routing wooden signs is popular because they often have a classic and rustic look that people love. Whether you like old-fashioned styles or modern designs, wood signs can fit any taste. Plus, you can make all sorts of fancy designs, from simple words to detailed pictures.
With the right tools and some creativity, you can create custom signs to show off your style or promote your business.
Tools and Materials for Routing Wood Signs:
Router: Since this article is about using a router to create a wooden sign, this tool is probably going to be the obvious choice. 🙂 Consider the type of sign you’re making and choose a router with appropriate power and features. For example, think about whether you need a variable speed router, plunge base router, etc…
Router bits: Different router bits are available for various tasks. Common options for signs include:
- Straight cutting bits: For clean cuts and shaping the sign.
- V-groove bits: For creating grooves, lettering, or decorative elements.
- Roman Ogee bits: For decorative edging.
- Cove bits: for rounded lettering.
More Tools:
- Safety glasses: Always wear safety glasses to protect your eyes from dust and debris.
- Hearing protection: Routers can be noisy, so hearing protection is recommended.
- Clamps: Clamps are helpful for securing the wood to your work surface while routing.
- Pencil and straightedge: For marking and measuring cuts.
- Sandpaper: For smoothing and finishing the wood.
Materials:
- Wood: Choose a type of wood suitable for routing. Solid woods like pine and oak are common choices, but MDF can be a cheaper alternative.
- Paint or stain (optional): To add color and finish to your sign.
- Clear coat (optional): For protecting the wood and paint.
- Screws or hanging hardware: For mounting your sign.
Additional items (depending on your project):
- Router templates (optional): These can help you achieve specific lettering or designs.
- Wood glue (optional): For gluing pieces together.
- Paint brushes or rollers (optional): For applying paint or stain.
- Drop cloth (optional): To protect your work surface.
Here are some additional tips:
- Plan your design: Sketch or design your sign beforehand and consider the lettering, layout, and any decorative elements you want to include.
- Choose the right wood: Select wood that is flat, free of cracks, and appropriate for the size and weight of your sign.
- Mark your cuts carefully: Double-check your measurements and markings before using the router.
- Start with a rough cut: Use a jigsaw or circular saw to make rough cuts before using the router for finer details.
- Use the correct router bit: Different bits are designed for specific tasks, so choose the appropriate one for your desired outcome.
- Practice on scrap wood: Before working on your final piece, it’s recommended to practice routing techniques on scrap wood to get comfortable with the tool.
By following these tips and gathering the necessary tools and materials, you can create a beautiful and personalized wooden sign using a router.
Design and Planning Process
Design Considerations for Creating Custom Wood Signs:
Consider the general style and theme of the sign, thinking of things like the intended purpose of the sign, the audience, and location. Choose fonts, graphics, and decorative elements that align with the desired aesthetic and message of the sign.
Pay attention to readability, ensuring that the text and graphics are clear and easy to understand from a distance. Avoid overly intricate or cluttered designs that may be difficult to read or interpret.
Consider and look at the size and shape of the wood sign and any specific design requirements or constraints. Keep in mind the available space for installation and visibility from different angles.
Planning the Layout and Dimensions of the Wood Sign:
Sketch out the layout and dimensions of the wood sign on paper or using design software, taking into account things like text placement, graphics, and borders. Explore and learn with different arrangements and compositions to find the most visually appealing design.
Determine the appropriate dimensions for the sign based on its intended location and visibility requirements.
Consider factors such as viewing distance, surrounding environment, and any regulations or guidelines for signage in the area.
Transferring the Design onto the Wood Surface:
Once you have your design ready, transfer it onto the wood surface using various methods such as tracing, stenciling, or printing. Use carbon paper or transfer paper to transfer the design accurately onto the wood, ensuring alignment and precision.
Alternatively, use masking or painter’s tape to create a stencil of the design and then apply paint or stain to transfer the design onto the wood surface. This method allows you more flexibility and customization in the design process.
Ensure that the design is transferred accurately and evenly onto the wood surface, as any mistakes or inconsistencies may affect the final appearance of the sign. Adjust as needed to achieve the desired result before proceeding with routing.
Routing Techniques for Wood Signs
Basic Routing Techniques for Outlining and Shaping the Sign:
Begin by securely fastening the wood sign blank in place and clamp it to your work area to prevent movement during routing. Select a router bit appropriate for the size and complexity of the design.
Adjust the depth of cut on the router to match the thickness of the wood sign blank and the desired depth of the outline. Set the depth accurately to avoid cutting too deep or too shallow. Depending on the depth of cuts, you may need to gradually lower the bit and make several passes, so you don’t remove too much material at one time. Once the router is set up, carefully guide it along the outline of the design, moving in a clockwise direction for smoother cuts.
Maintain a steady hand and a consistent feed rate as you guide the router along the wood surface. Avoid forcefully pushing or pulling the router, resulting in uneven cuts, or splintering. Instead, let the router’s cutting action do the work while you provide gentle guidance.
Throughout the routing process, periodically check the depth of the cut and adjust as needed to ensure uniformity and accuracy. Take your time and work methodically to gradually shape the sign to the desired dimensions, paying close attention to detail and precision.
Advanced Routing Techniques for Adding Depth, Texture, and Detail:
Advanced routing techniques offer opportunities to enhance the wood sign with depth, texture, and intricate detail. Experiment with different router bits and strategies to achieve the desired effects.
For adding depth to the sign, consider using plunge-routing techniques. This involves starting the router bit within the wood surface rather than at the edge, allowing you to create recessed areas or pockets within the sign.
Plunge routing is handy for creating raised lettering or adding depth to decorative elements.
Explore using specialty router bits such as V-groove or carving bits to create texture and detail on the sign.
These bits are designed to cut into the wood surface at various angles and depths, allowing you to create intricate designs, lettering, or decorative motifs. Experiment with different bit profiles and techniques to achieve the desired texture and visual impact.
Tips for Achieving Clean and Precise Cuts During Routing:
To achieve clean and precise cuts when routing wood signs, it’s essential to follow best practices and employ effective techniques:
- Ensure the router bit is sharp and properly aligned before the routing process begins. Dull or misaligned bits can result in uneven cuts and splintering.
- Maintain a consistent feed rate and steady hand pressure while guiding the router along the wood surface. Avoid stopping or hesitating mid-cut, as this can lead to visible inconsistencies.
- Take shallow passes with the router, especially when working with hardwoods or dense materials. Too much material in a single pass can overload the router and cause tear-out or splintering.
- Use sacrificial backing boards or masking tape along the edges of the sign to reduce tear-out and prevent chip-out along the edges. This helps to ensure clean and crisp edges on the finished sign.
Always take proper safety precautions during operations, including eye and hearing protection. In addition, ensure that the work area is well-ventilated to minimize wood dust and debris exposure.
Finishing and Assembly
Sanding and Smoothing the Routed Surfaces of the Wood Sign:
Once the routing is complete, sand the surfaces of the wood sign to remove any roughness or irregularities left by the router.
Start with a coarse grit sandpaper and gradually move to finer grits to achieve a smooth and uniform finish. Pay special attention to the edges and corners of the sign to ensure they are smooth and splinter free.
Applying Finishes to Enhance the Appearance and Durability:
After sanding, apply finishes and sealants to protect the wood sign and enhance its appearance. Choose a finish or material that complements the overall look of the sign, such as stain for a rustic look or paint for a more vibrant finish.
Apply the finish evenly using a brush, roller, or spray gun, following the manufacturer’s instructions for drying and curing times. Once the finish is dry, apply a sealant to protect the wood from moisture, dust, UV rays, and other environmental factors.
Assembling Additional Components such as Hanging Hardware or Frames:
Finally, assemble any additional components needed to complete the wood sign, such as hanging hardware or frames.
Depending on the design and intended use of the sign, you may need to attach hooks, wires, or brackets for hanging or frame the sign for display.
Use appropriate fasteners and hardware to securely attach these components to the sign, ensuring they are correctly aligned and reinforced for stability. Once assembled, your wood sign is ready to be displayed and enjoyed for years.
Safety Considerations
Safety Precautions to Follow When Using Routers and Other Woodworking Tools:
When using routers and other woodworking tools, it’s essential to follow safety precautions to prevent accidents and injuries. Always read and understand the manufacturer’s instructions before operating any tool.
Ensure the work area is well-lit and clutter-free to prevent tripping hazards. Keep your hands and fingers away from the router bit and cutting area while the tool operates. Use push sticks or other safety devices to safely guide the workpiece through the router.
Never force the router or attempt to remove jammed material while the tool is running. Always turn the router off and wait for the bit to stop spinning before making any adjustments or changes to the setup.
Personal Protective Equipment (PPE):
When routing wood signs, it’s essential to wear appropriate personal protective equipment (PPE) to protect yourself from possible hazards. This will include safety glasses or goggles to protect your eyes from flying wood dust, chips, or debris.
Always wear hearing protection like earplugs or earmuffs to reduce the risk of hearing damage loss from prolonged exposure to the loud noise generated by the router.
Wear a dust mask or respirator to prevent inhalation of wood dust, which can irritate the respiratory system and cause health problems over time.
Proper Handling and Storage of Woodworking Materials and Equipment:
Proper handling and storage of woodworking materials and equipment is essential for maintaining a safe work environment. Store routers and other tools in a dry, secure location when not in use, preferably in their original cases or dedicated storage boxes to protect them from damage.
Keep sharp router bits and cutting tools out of reach of children and unauthorized users. When handling wood materials, use caution to avoid splinters and sharp edges.
Dispose of sawdust and wood scraps properly to prevent fire and tripping hazards in the workspace. Regularly check, inspect, and maintain tools and equipment to ensure they are in good working condition and free of defects that could compromise safety.
Tips and Tricks for Success
Tips for Troubleshooting Common Issues Encountered During Routing:
- If experiencing tear-out or splintering, try using a sharp router bit and taking shallow passes to minimize the problem.
- Ensure the router is adjusted correctly and the wood is securely clamped in place for uneven cuts or rough surfaces.
- If you encounter burning or scorching marks on the wood, reduce the router speed or use a slower feed rate to prevent overheating.
Advice for Achieving Professional-Quality Results:
Take your time to plan and design your wood sign carefully before beginning the routing process.
Practice with scrap wood or test pieces to familiarize yourself with different router bits and techniques.
Use solid, high-quality materials and tools to ensure the best outcome for your wood sign routing projects.
Pay attention to detail and take pride in your artistry to achieve professional-quality results.
Recommendations for Further Resources and Learning Opportunities in Wood Sign Routing:
Explore online tutorials, woodworking forums, and instructional videos for additional guidance and inspiration.
Consider taking a woodworking class or workshop to learn new techniques and improve your skills.
Invest in books or instructional guides on wood sign routing and woodworking techniques for in-depth knowledge and reference.
Connect with other woodworkers and enthusiasts through social media groups or local woodworking clubs to share tips, tricks, and resources.
Conclusion
Using a router is a fun way for woodworkers to make custom signs. With different techniques, you can shape the signs and add beautiful details.
Proper planning is very important for routing signs. Thinking about the design and layout, and transferring it onto the wood exactly as you want it to look will go a long way in getting the outcome you want. Adding your own finishing touches will add to the sign’s quality.
If you’re just starting out, having the right tools, and knowing how to use them is critical. Wood sign routing is great for making signs for businesses, decorating homes, or giving unique gifts. It’s a way to show off your creativity and skills in woodworking.
- What are the Best DeWALT Routers? – Here are the Details
- How to Use a Palm Router
- How to Plane Wood With A Router
- How to Make a Router Sled
- Types of Brad Nail Guns
- How to Oil a Brad Nailer
- How to Install (or Insert) a Router Bit
- How to Chamfer Wood With a Router
- Finding the Perfect Table Saw – Five Brands Reviewed and Explained
- Carving the Future: A Review of the Best CNC Routers
- Nailing It: The Best Brad Nailers for Your Woodworking Projects
- What are the Best 3HP Routers?
- How to Make a DIY Router Sled
- Nail Gun Basics: How to Load a Brad Nailer
- How to Load a Staple Gun
- Mastering the Craft: How to Build a DIY Router Table Fence
- How to Cut a Square Hole With a Router
- Notching Techniques: How to Cut Perfect Notches in Wood
- How to Hollow Out Wood With A Router
- Best Wood Routers Under $100
- How to Make a Wooden Sign with a Router
- How to Use a Router Straight Edge Guide
- The Best Plunge Routers: A Review and Comparison Guide
- Router Circle Cutting Jigs
- Maximizing Efficiency with the Dewalt Router Table